
CICD on AWS : From 📝Commit to ☁️Ship, AWS Does the Trip!
Day 6 : ⏳ No More Manual Deployments! Setting Up CI/CD on AWS with Ease


🚀 Building a Full CI/CD Pipeline for a Live Website – A Hands-On Guide! 🎯
I don’t just believe in theory-heavy blogs—I love bringing concepts to life with real-world implementations! In this blog, we won’t just talk about CI/CD; we’ll build a fully functional pipeline for a application, taking it from development to production step by step. 🔥
🔍 What to Expect?
✅ Bite-sized theory – Just enough to keep things interesting, without overwhelming you!
✅ Visuals that explain it all – Expect screenshots, diagrams, and flowcharts to break down every stage. 🖼️
✅ Hands-on implementation – We’ll create an actual CI/CD pipeline for an application.
Definition of CI/CD
CI/CD automates the software release lifecycle. It eliminates or minimizes manual processes involved in moving code from a commit to production.
Continuous Integration (CI): Automates code integration into a shared repository.
Continuous Delivery (CD): Requires manual approval before deployment.
Continuous Deployment (CD): No manual approval; changes are deployed automatically.
Key Difference: Continuous Delivery vs. Continuous Deployment
Continuous Delivery: Requires manual approval before deploying to production.
Continuous Deployment: No manual approvals; changes automatically flow to production.
CI/CD Pipeline Stages
A typical CI/CD pipeline includes:
Source: Code resides in a repository (e.g., GitHub).
Build: Code is compiled and prepared for testing.
Test: Automated tests validate the changes.
Staging: Code is deployed to a pre-production environment for further testing.
Production: Code is released to end users.
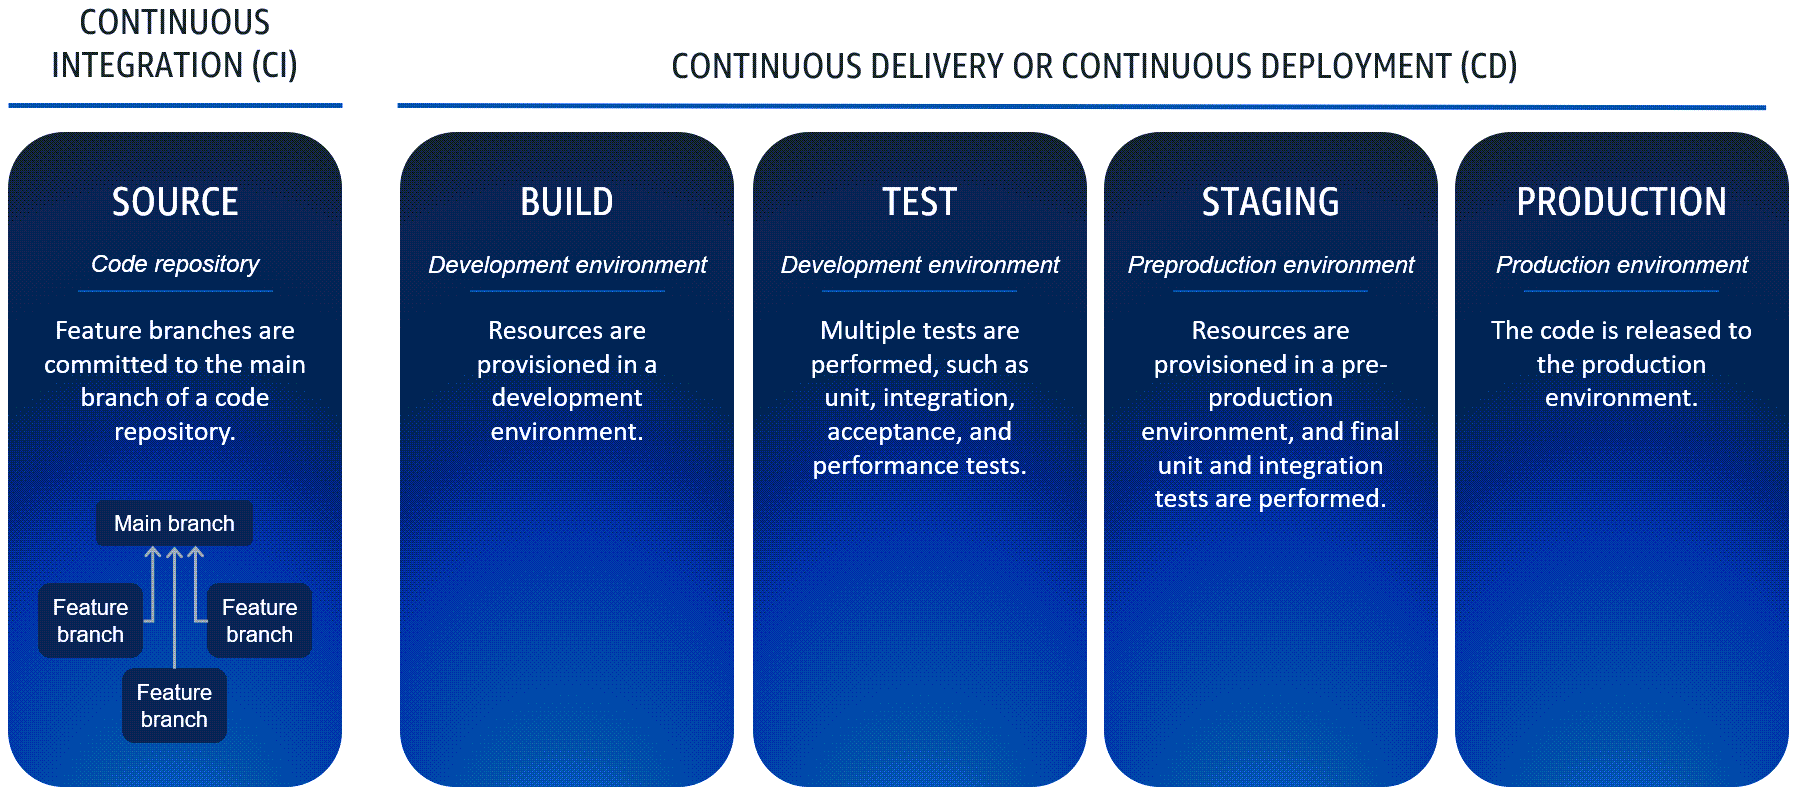
Continuous Integration Workflow
Developers work in feature branches created from the main branch.
Once ready, feature branches are merged into the main branch.
Feature branches are never deployed directly to upper environments.
Continuous Delivery Workflow
The pipeline starts by pulling code from the main branch.
The build process executes tasks defined in an Infrastructure as Code (IaC) document (though this is optional).
If a test fails, the pipeline rolls back to the previous state, and subsequent changes must restart the CI/CD process.
Modern CI/CD Workflow
Trunk-Based Development: Developers merge frequent, small updates into a main branch (trunk), which is continuously built and tested.
Replaces Gitflow Workflow: Older workflows (such as Gitflow, which relied on separate development and release branches) are now largely replaced by trunk-based development.
GitFlow Workflow

Trunk-Based Workflow

🚀 Let's begin implementing the project! 💻🔥
I followed Abhishek Veeramalla (AWS Zero to Hero Course) for this project implementation
🛠️ Tech Stack & Services We’ll Use in This CI/CD Project 🚀
Before we dive into building our CI/CD pipeline on AWS, let’s go over the key tools & services we’ll be using
📌 GitHub – Code Source & Version Control
🚀 AWS Code Pipeline – CI/CD Orchestration
🏗️ AWS Code Build – Building & Testing
📦 AWS Code Deploy – Deployment Automation
🔐 AWS Systems Manager (Parameter Store) – Secure Config Storage
🛡️ AWS Secrets Manager – Sensitive Data Storage
💻 AWS EC2 – Hosting Our Application
🐳 Docker – Containerized Deployment
These below technologies usage have not been covered in this article but I have used these for my project:
🖥️ Nginx – Reverse Proxy & Load Balancing
🌍 Hostinger – Domain & DNS Management
This powerful stack will allow us to automate deployments, secure configurations, and scale effortlessly! 🌟
🚀 CI/CD Pipeline Workflow – Simple Diagram Representation

Step 1: Create a Build Project (without linking it to CodePipeline, as we will trigger it manually for testing purposes).


🛠️ Buildspec.yml is Essential!
📂 Reference: buildspec.yml & Dockerfile
For your Next.js or CI/CD-related projects, you can refer to the attached buildspec.yml and Dockerfile. These configurations are universal and can be adapted as needed! 🚀🔧
version: 0.2

env:
  parameter-store:
    DOCKER_USERNAME: /nsutiif_ai4humanity/docker_credentials/username
    DOCKER_PASSWORD: /nsutiif_ai4humanity/docker_credentials/PAT

phases:
  install:
    runtime-versions:
      nodejs: 18

  pre_build:
    commands:
      - echo "Retrieving environment variables from AWS Systems Manager..."
      - aws ssm get-parameter --name "/nsutiif_ai4humanity/env_file" --with-decryption --query "Parameter.Value" --output text > .env
      - echo "Environment variables fetched successfully."

      - echo "Logging in to Docker Hub..."
      - echo "$DOCKER_PASSWORD" | docker login -u "$DOCKER_USERNAME" --password-stdin

  build:
    commands:
      - echo "Building Docker Image..."
      - docker build --build-arg ENV_FILE=.env -t "$DOCKER_USERNAME/event-website:latest" .

  post_build:
    commands:
      - echo "Pushing the Docker image to Docker Hub..."
      - docker push "$DOCKER_USERNAME/event-website:latest"
      - docker logout
      - echo "Build completed successfully."
# Step 1: Use the official Node.js image from Docker Hub
FROM node:18-alpine AS builder

# Step 2: Set the working directory inside the container
WORKDIR /usr/src/app

# Step 3: Copy package.json and dependencies to the container
COPY package.json package-lock.json ./

# Step 4: Install dependencies
RUN npm install

# Step 5: Copy the rest of the project files into the container
COPY . .

# Step 6: Load environment variables securely (if using build args)
ARG ENV_FILE=.env
COPY $ENV_FILE .env

# Step 7: Build the Next.js app
RUN npm run build

# Step 8: Use a smaller base image for the production environment
FROM node:18-alpine AS runner

# Step 9: Set working directory
WORKDIR /usr/src/app

# Step 10: Copy only the necessary files from the builder stage
COPY --from=builder /usr/src/app/package.json ./
COPY --from=builder /usr/src/app/node_modules ./node_modules
COPY --from=builder /usr/src/app/.next ./.next
COPY --from=builder /usr/src/app/public ./public

# Step 11: Expose the port Next.js runs on
EXPOSE 3000

# Step 12: Set environment variable for production mode
ENV NODE_ENV=production

# Step 13: Define the command to run the app
CMD ["npm", "start"]
The buildspec.yml file contains all the instructions needed to build the project. You can:
📌 Store it anywhere in your Git repository and load it from there.
📌 Or, write your own buildspec.yml file manually.
🔍 Logs Are Your Best Friend!
A crucial step in CI/CD is reading logs. In the first step, when I built the project, it generated build logs. As a DevOps engineer, it's a best practice to analyze these logs to troubleshoot issues effectively.
⚠️ Debugging Takes Time!
It took me 10 builds to finally get a successful one! While I can't cover every debugging step, here are some common errors you might encounter:
✅ 1. Allow CodeBuild to Build Docker Images
🔍 In the Environment Section of the Build, there’s a privilege flag that needs to be enabled ✅ for CodeBuild to build Docker images. Make sure it’s checked!

🔑 2. Grant CodeBuild Access to Parameter Store
The role assumed by CodeBuild needs IAM permissions to access AWS Systems Manager Parameter Store. Ensure the role has the necessary permissions!
🔒 3. Securely Passing .env File to Docker
You CANNOT push your .env file to GitHub ❌. So, how do you pass it securely?
✔️ What I used:
📌 AWS SSM Parameter Store to store environment variables securely.
📌 Modified buildspec.yml & Dockerfile to fetch these secrets inside the build process. (A great way I discovered! 🎯)
🔗 4. Connecting a Private GitHub Repo to CodeBuild
🔍 Issue: AWS CodeBuild couldn't connect to my GitHub repo during the Build Stage 🚧. I’m not sure yet whether this was due to the private repo settings or some other configuration issue. 🤔
💡 Workaround: To proceed with the build, I temporarily made my repo public 🌍. I’ll investigate further and update once I find the root cause! 🧐🔧


From this below image ,it is clear that Docker image has been successfully pushed to your private repository on Docker Hub! 🎉🚀

Step 2: Set Up a CodePipeline (The Orchestrator 🎯)
Now, we configure AWS CodePipeline, which acts as the orchestrator of the CI/CD process.
🔹 How It Works:
1️⃣ On each commit to the main branch in GitHub (Source), a request is sent to CodePipeline.
2️⃣ In response, CodePipeline triggers CodeBuild to start the build process.
(You can commit to the repository and test to see the automation live in action with no manual intervention)
While setting up AWS CodePipeline, you can mostly keep the default settings for each stage. Just make sure to:
✅ Set the Pipeline Name 📌
✅ Add Source and connect it with GitHub (via GitHub App) 🔗
✅ Set Build Source as AWS CodeBuild 🛠️
✅ Skip the Test and Deploy stages ❌


Step 3: Set Up CodeDeploy & Link It with CodePipeline 🚀
Now, we configure AWS CodeDeploy and integrate it into CodePipeline (as the Deploy Stage, which we skipped earlier).
🔹 How It Works:
✅ After the Build Stage completes successfully, the Deploy Stage kicks in.
✅ CodeDeploy takes over and deploys the latest changes to your EC2 instance, rendering them live on the server.
This step ensures a seamless, automated deployment process! 🎯🔥
Here's a reference for appspec.yml along with scripts that you can use for deployment with AWS CodeDeploy.
version: 0.0
os: linux

hooks:
  BeforeInstall:
    - location: scripts/install_dependencies.sh
      timeout: 300
      runas: root

  ApplicationStart:
    - location: scripts/start_application.sh
      timeout: 300
      runas: root

  ValidateService:
    - location: scripts/validate_service.sh
      timeout: 300
      runas: root
#install_dependencies.sh
#!/bin/bash

# Update package manager
sudo apt-get update

# Install Docker if not installed
if ! [ -x "$(command -v docker)" ]; then
  echo "Installing Docker..."
  sudo apt-get install -y docker.io
fi

# Ensure Docker is running
sudo systemctl start docker
sudo systemctl enable docker
sudo usermod -aG docker $USER
newgrp docker
#start_application.sh
#!/bin/bash

# Enable script debugging (optional)
set -e  # Exit script on error
set -o pipefail  # Catch pipeline errors

# Load environment variables from .env file at root
echo "Loading environment variables..."
set -a  # Automatically export variables
source /home/ubuntu/.env
set +a  # Stop auto-export

echo "Environment variables loaded successfully."

# Docker login
echo "Logging into Docker Hub..."
echo "$DOCKER_PAT" | docker login -u "$DOCKER_USERNAME" --password-stdin

# Pull the Docker image from Docker Hub
echo "Pulling the latest Docker image..."
docker pull nsutiif/event-website:latest

# Stop and remove any existing container (if it's running)
if [ "$(docker ps -q -f name=event-website)" ]; then
  echo "Stopping existing container..."
  docker stop event-website
  docker rm event-website
fi

# Start the Docker container
echo "Starting new container..."
docker run -d --name event-website --env-file /home/ubuntu/.env  -p 3000:3000 nsutiif/event-website:latest
#validate_service.sh
#!/bin/bash

echo "Application is running successfully!"
🔑 Important Points (To Avoid Debugging Later) 🚀
Follow this structured flow for a smooth deployment:
📌 Application ➝ Deployment Group ➝ Deployment
✅ 1. Install CodeDeploy Agent on EC2
Make sure the CodeDeploy Agent is installed on your EC2 instance.
🔗 Click here to see installation steps
📂 2. appsec.yml Must Be in the Root Directory
Always keep appsec.yml in the root directory for CodeDeploy to work properly.
✍️ 3. Create Deployment Scripts
You'll need scripts referenced in appsec.yml
🔑 4. Set Up Required IAM Roles
🔹 EC2 Role ➝ Grants EC2 access to CodeDeploy (Make the EC2 instance assume this role)
🔹 CodeDeploy Role ➝ Grants CodeDeploy access to EC2
🔒 5. Check EC2 Security Group
Ensure the Security Group allows necessary inbound/outbound traffic (like SSH, HTTP, etc.).
🗂️ 6. Select the Correct Source Artifact in Deployment
During the Build Stage 🏗️, AWS CodePipeline automatically creates an S3 bucket 📦 to store Build Artifacts. These artifacts are generated as output artifacts from one stage and used as input artifacts for the next.
In the Deploy Stage 🚀, ensure you select Source Artifact instead of Build Artifact, as CodeDeploy 🔄 needs access to the S3 bucket artifacts that were generated in the Source Stage (e.g., application source files). The correct selection ensures a smooth deployment process without missing dependencies.

🛠️ 7. Secure Docker Login Credentials
During the Docker login step in the start_application.sh script 🚢, hardcoding the credentials 🔑 caused the deployment to fail ❌ in the Deploy Stage. To fix this, I’ve stored the credentials in an env file located on the server 🖥️. The script now retrieves and uses the credentials securely from there ✅.

I also need to pass the env file in the docker run command 🚢, or else my Next.js application ⚛️ throws a 500 Internal Server Error ❌. Using the same method as before, the script accesses the env file from the server 🖥️ and passes it to the docker run command.
However, there's a limitation: every time I change something in the env file, I have to manually log in to the server and update the file before committing the new settings. If I don't do this, the Deploy Stage fails or encounters errors.
I need to figure out a more automated solution, as logging into the server every time isn’t ideal for a fully automated pipeline.


🎉 Finally, After Tons of Debugging… My Application is LIVE! 🚀

Check out the video link attached 🎥—you can see the live automated change rendering on the server! 🤩
✅ We just made a commit to the repo, and the rest was handled automatically by our CI/CD Pipeline! 💪
🔍 What Happened?
Initially, I recorded the video, but... 😅
⚠️ My EC2 instance ran out of memory, causing the Deploy Stage to fail ❌
💡 After removing dangling images, everything worked perfectly as shown in the video! 🎯
Click to see CI/CD automation in action! 🚀🔥
The image 📸 shows the complete history 📜 of the pipeline execution ⏳, detailing the total duration ⏱️ required to render the changes 🔄 from a commit on GitHub 🐙 (source) to the server 🖥️.

🔄 One-Shot View of the Implementation Flow
